ShaderGraph → GDShader
This is a post about Shaders in Godot. If you wish to just jump straight to the technical part of this post then press here.
Unity → Godot
Let's start this blog out with an entry about what I'm currently working on. It's a puzzle game that takes the ubiquitous undo/redo functionality of computers and turn it into a core mechanic. I have been working on this for a few months now and it has grown from a one man prototype made in a couple of days back in October, to a proper demo in November and one new member on the team to now a small team of three working on a vertical slice that we can show off at Nordic Game Jam 2025.
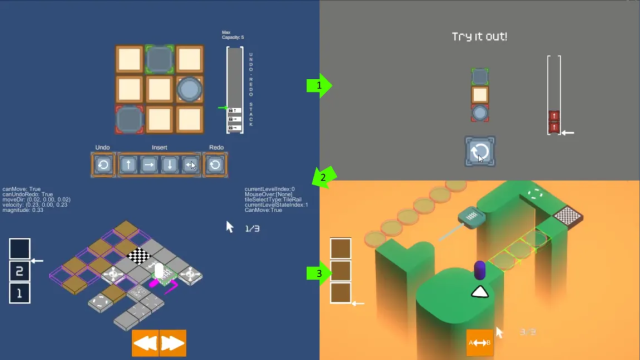
The game started out being made in Unity but given the current development climate we have decided to see if we could make our game come true with Godot instead. As of writing this post (February 2025) Unity is not doing so great and have been on a downward spiral for a couple of years now. Hopefully they can turn the ship around as there are a lot of good people there and the software has served many for years, but we'll have to wait and see.
All that said we are well aware that we are going to have to give up a lot of conveniences that Unity afforded us and start over, recreate it ourselves or simply accept that we can't have that right now (like console, mobile and web support for .NET. Seems way off still sadly). We are currently using Godot 4.3 (C# Mono Version). But to start out, I decided to see if I could convert our project over to Godot from Unity. To do that I have to recreate a bunch of code as we now have new requirements from the last demo (which you can play in your browser should you want to here) but I also have to port over as many of the assets as possible so that we can spend less time re-inventing things and more time developing new things instead. That's where this blogpost comes in. I have to convert a simple noise shader made with Unity's ShaderGraph into the HLSL-like language GDShader that Godot uses.
Breakdown
The shader itself is not too complicated. It consists of two triplanar nodes, some blend nodes and then we take the value from the output of that and derive colour, roughness and metallic values. I'm no shader wiz by any means however even I could figure out what was going on here.

So from this image we need to figure out three things:
- How to do a Triplanar function in GDShader
- How to do a Blend function in GDShader
- What Godot's equivalent values are to Unity's
Absolute World Spacevalues both for our World Position Input and our World Normal Input.
Our shader also needs to have several values that can be used to adjust the shader as needed. These are:
- Base Colour
- Blend Mode
- Small Noise Texture
- Small Noise Tiling Factor
- Small Noise Blending Factor
- Small Noise Power Factor
- Large Noise Texture
- Large Noise Tiling Factor
- Large Noise Blending Factor
- Large Noise Power Factor
- Smoothness Factor
- Metallic Factor
Blend
The variables needed to adjust the shader are trivial to make, so we will instead start with the easier of the two functions we need, the Blend Function.
A blend function is fundamentally a fairly simple concept. In reality all a blend is, is taking some colour value and mixing it with some other colour value + opacity. One thing we don't have out of the box is a Blend Mode (Normal, Multiply, Add, Overlay, etc) but we are also going to implement that as an int just to have the option (since GDShaders currently do not have enum_hint support) or to use the blend code somewhere else later. Now luckily for us we don't have to invent a mix() call. The GDShader language already comes with such a function (although likely to have been taken directly from HLSL). You can do further reading on what a mix() function is here.
Our blend function, to have Unity feature parity, needs as input:
- A Base Colour
- A Blend Colour
- An Opacity Value
- A Blending Mode
We are going to implement four different modes for now (although there are many more):
- Normal
- Multiply
- Add
- Overlay
So let's start out with our base code for our shader:
// Blend function with different modes
vec4 blend_colors(vec4 baseColor, vec4 blendColor, float opacity, int mode) {
    vec4 result = baseColor;
    if (mode == 0) { // Normal

    } else if (mode == 1) { // Multiply

    } else if (mode == 2) { // Add

    } else if (mode == 3) { // Overlay

    }

    return result;
}
A very simple if/else setup that allows us to add more modes down the road. Now strictly speaking, having branching in shaders is generally discouraged due to performance concerns, however some times they are unavoidable. This is, in my limited shader opinion, one of those cases.
For the Normal mode we simply need to mix the base colour with the blend colour: mix(baseColor, blendColor, opacity);
For the Multiple mode we need to mix the base colour with the blend colour multiplied by the base colour: mix(baseColor.rgb, baseColor.rgb * blendColor.rgb, opacity);
For the Add mode we need to mix the base colour with the blend colour added with the base colour: mix(baseColor.rgb, baseColor.rgb + blendColor.rgb, opacity);
All in all fairly straight forward so far. These types of modes are trivial to implement and as such their implementation are as simple as those one liners you see here. However the Overlay mode requires a bit extra as we are not just mixing two colours as-is, we are computing individual components of each colour value to create the overlay blend colour we need for our mix() call:
vec3 base = baseColor.rgb;
vec3 blend = blendColor.rgb;
vec3 overlay = mix(2.0 * base * blend, 1.0 - 2.0 * (1.0 - base) * (1.0 - blend), step(0.5, base));
result.rgb = mix(base, overlay, opacity);
The calculation itself is a bit out of scope for this blog post, but read more about it here if you are interested. It's a bit dry math but the above essentially translates to that math formula.
So finally we end up with our blend function:
// Blend function with different modes
vec4 blend_colors(vec4 baseColor, vec4 blendColor, float opacity, int mode) {
    vec4 result = baseColor;
    if (mode == 0) { // Normal
        result = mix(baseColor, blendColor, opacity);
    } else if (mode == 1) { // Multiply
        result.rgb = mix(baseColor.rgb, baseColor.rgb * blendColor.rgb, opacity);
    } else if (mode == 2) { // Add
        result.rgb = mix(baseColor.rgb, baseColor.rgb + blendColor.rgb, opacity);
    } else if (mode == 3) { // Overlay
        vec3 base = baseColor.rgb;
        vec3 blend = blendColor.rgb;
        vec3 overlay = mix(2.0 * base * blend, 1.0 - 2.0 * (1.0 - base) * (1.0 - blend), step(0.5, base));
        result.rgb = mix(base, overlay, opacity);
    }
    result.a = baseColor.a;
    return result;
}
The math and the setup for this is not all that complex really and you could keep expanding with far more blending modes if you wanted to (just look at the last link for more blend modes if you want to try).
Triplanar Mapping
Triplanar mapping is for when you don't have texture coordinates or you wish to make multiple textures line up with each other or some other reason for making your own UV coordinates. You can check out a tutorial here which implements it from scratch or here if you are using Unity or wish to see how one could implement that in Unity's shader language.
We are going to use it to help blend our two noise textures together so that we can have coarse and fine grained noise on the same object at the same time in a single material. The math behind this is not something I'm super familiar with however to have feature parity with Unity we are going to implement the following inputs:
- Texture Sample
- World Position
- World Normal
- Tiling Factor
- Blend Factor
// Expects position and normal in world space.
vec4 triplanar_mapping(sampler2D tex, vec3 position, vec3 normal, float tiling, float blend) {

}
First we will calculate the blend weights for each of our axis based on the world normal:
vec3 abs_normal = abs(normal);
abs_normal = pow(abs_normal, vec3(blend));
abs_normal /= (abs_normal.x + abs_normal.y + abs_normal.z);
We need this value later for when we are calculating the final blended colour.
Next we need to calculate the UV coordinates for each of our projections (each axis) seeing as we don't have any UV coordinates to rely on (UV space is 2-dimensional):
vec2 uv_x = position.yz * tiling;
vec2 uv_y = position.xz * tiling;
vec2 uv_z = position.xy * tiling;
And finally we need to sample the texture on each of our axis as well to get the right values for the final blend:
vec4 x_tex = texture(tex, uv_x);
vec4 y_tex = texture(tex, uv_y);
vec4 z_tex = texture(tex, uv_z);
texture() is another build-in method which you can read about here. The idea is that you pass off a texture to sample from and a 2d uv value. The texture() call will then return a texel given the coordinates that you can use to sample with in the final step:
vec4 blended_color = x_tex * abs_normal.x + y_tex * abs_normal.y + z_tex * abs_normal.z;
So now all that's left is putting it all together:
// Expects position and normal in world space.
vec4 triplanar_mapping(sampler2D tex, vec3 position, vec3 normal, float tiling, float blend) {
    // Calculate the blend weights for each axis based on the normal
    vec3 abs_normal = abs(normal);
    abs_normal = pow(abs_normal, vec3(blend));
    abs_normal /= (abs_normal.x + abs_normal.y + abs_normal.z);

    // UV coordinates for each projection
    vec2 uv_x = position.yz * tiling;
    vec2 uv_y = position.xz * tiling;
    vec2 uv_z = position.xy * tiling;

    // Sample the texture on each axis
    vec4 x_tex = texture(tex, uv_x);
    vec4 y_tex = texture(tex, uv_y);
    vec4 z_tex = texture(tex, uv_z);

    // Blend the textures based on the normal
    vec4 blended_color = x_tex * abs_normal.x + y_tex * abs_normal.y + z_tex * abs_normal.z;
    return blended_color;
}
With that we now have the final piece to call Godot's fragment() function as the above code will be used on the fragment part of the shader, not the vertex part.
Putting It All Together
So now that we have the two functions we need to replicate the shader from Unity let's put it all together and create the code that will run in the fragment() function call. We still have something left from our breakdown list which is how Godot can provide a World Position and a World Normal. Unity have these values built-in as helper functions but Godot does not have an equivalent. Luckily the calculation to get those are fairly simple (if a bit hard to wrap your head around if you know nothing about Matrix Multiplication) and someone on the Godot Café Discord server was very helpful and helped me out with that! Can highly recommend joining that if you are using Discord.
// Convert position and normal from view space to world space.
vec3 position = (INV_VIEW_MATRIX * vec4(VERTEX, 1.0)).xyz;
vec3 normal = (INV_VIEW_MATRIX * vec4(NORMAL, 0.0)).xyz;
As you can see, we take the view matrix and multiply that with our vertex and normal positions to get the world space equivalent of those. The calculation itself is fairly trivial however understanding it is not. I don't know much about Matrix multiplication myself so I was very grateful that someone could help me with that.
Next, we need to normalize() our normal value to ensure that it falls within sensible values. The normalize() function simply creates a unit vector with a length of 1. Read about it here. We can then use our triplanar function from earlier to calculate our noise textures. This is exactly like the Triplanar nodes in Unity's shadergraph:
normal = normalize(normal);
vec4 smallNoiseTri = triplanar_mapping(SmallNoise, position, normal, SmallNoiseTiling, SmallNoisePower);
vec4 largeNoiseTri = triplanar_mapping(LargeNoise, position, normal, LargeNoiseTiling, LargeNoisePower);
Then we can further compute using those by blending them together, also like you see in Unity's Shadergraph:
smallNoiseTri = blend_colors(BaseColor, smallNoiseTri, SmallNoiseBlend, BlendMode);
largeNoiseTri = blend_colors(smallNoiseTri, largeNoiseTri, LargeNoiseBlend, BlendMode);
And lastly we grab the metallic and smoothness values from the resulting noise colour. This took a bit of trial and error as Unity abstracts the actual values used away when it casts from one type of value to another (vector to float in this case) so I had to trial and error my way through this part but I eventually go the right values and applied them to the shader constants found in the GDShader language for various properties:
float metallic = (largeNoiseTri * Metallic).g;
float smoothness = (largeNoiseTri * Smoothness).r;
ALBEDO = vec3(largeNoiseTri.r, largeNoiseTri.g, largeNoiseTri.b);
METALLIC = metallic;
ROUGHNESS = smoothness;
Putting it all together, this is the entire shader:
shader_type spatial;

uniform vec4 BaseColor: source_color = vec4(0.5, 0.5, 0.5, 1.0);
uniform int BlendMode = 1;
uniform sampler2D SmallNoise;
uniform float SmallNoiseTiling = 1.0;
uniform float SmallNoiseBlend: hint_range(0.0, 1.0) = 0.5;
// Controls the sharpness of the triplanar blending.
// Default is the previously hardcoded value of 0.5.
uniform float SmallNoisePower: hint_range(0.25, 8.0) = 0.5;
uniform sampler2D LargeNoise;
uniform float LargeNoiseTiling = 1.0;
uniform float LargeNoiseBlend: hint_range(0.0, 1.0) = 0.5;
// Controls the sharpness of the triplanar blending.
// Default is the previously hardcoded value of 0.5.
uniform float LargeNoisePower: hint_range(0.25, 8.0) = 0.5;
uniform float Smoothness: hint_range(0.0, 1.0) = 0.0;
uniform float Metallic: hint_range(0.0, 1.0) = 0.0;

// Expects position and normal in world space.
vec4 triplanar_mapping(sampler2D tex, vec3 position, vec3 normal, float tiling, float blend) {
    // Calculate the blend weights for each axis based on the normal
    vec3 abs_normal = abs(normal);
    abs_normal = pow(abs_normal, vec3(blend));
    abs_normal /= (abs_normal.x + abs_normal.y + abs_normal.z);

    // UV coordinates for each projection
    vec2 uv_x = position.yz * tiling;
    vec2 uv_y = position.xz * tiling;
    vec2 uv_z = position.xy * tiling;

    // Sample the texture on each axis
    vec4 x_tex = texture(tex, uv_x);
    vec4 y_tex = texture(tex, uv_y);
    vec4 z_tex = texture(tex, uv_z);

    // Blend the textures based on the normal
    vec4 blended_color = x_tex * abs_normal.x + y_tex * abs_normal.y + z_tex * abs_normal.z;
    return blended_color;
}

// Blend function with different modes
vec4 blend_colors(vec4 baseColor, vec4 blendColor, float opacity, int mode) {
    vec4 result = baseColor;
    if (mode == 0) { // Normal
        result = mix(baseColor, blendColor, opacity);
    } else if (mode == 1) { // Multiply
        result.rgb = mix(baseColor.rgb, baseColor.rgb * blendColor.rgb, opacity);
    } else if (mode == 2) { // Add
        result.rgb = mix(baseColor.rgb, baseColor.rgb + blendColor.rgb, opacity);
    } else if (mode == 3) { // Overlay
        vec3 base = baseColor.rgb;
        vec3 blend = blendColor.rgb;
        vec3 overlay = mix(2.0 * base * blend, 1.0 - 2.0 * (1.0 - base) * (1.0 - blend), step(0.5, base));
        result.rgb = mix(base, overlay, opacity);
    }
    result.a = baseColor.a;
    return result;
}

void fragment() {
// Convert position and normal from view space to world space.
    vec3 position = (INV_VIEW_MATRIX * vec4(VERTEX, 1.0)).xyz;
    vec3 normal = (INV_VIEW_MATRIX * vec4(NORMAL, 0.0)).xyz;
    normal = normalize(normal);
    vec4 smallNoiseTri = triplanar_mapping(SmallNoise, position, normal, SmallNoiseTiling, SmallNoisePower);
    vec4 largeNoiseTri = triplanar_mapping(LargeNoise, position, normal, LargeNoiseTiling, LargeNoisePower);

    smallNoiseTri = blend_colors(BaseColor, smallNoiseTri, SmallNoiseBlend, BlendMode);
    largeNoiseTri = blend_colors(smallNoiseTri, largeNoiseTri, LargeNoiseBlend, BlendMode);

    float metallic = (largeNoiseTri * Metallic).g;
    float smoothness = (largeNoiseTri * Smoothness).r;
    ALBEDO = vec3(largeNoiseTri.r, largeNoiseTri.g, largeNoiseTri.b);
    METALLIC = metallic;
    ROUGHNESS = smoothness;
}
Conclusion
So in conclusion, what did we end up with? We ended up with a shader that we can apply to what Godot aptly calls a ShaderMaterial and it gives us the following properties to play with:
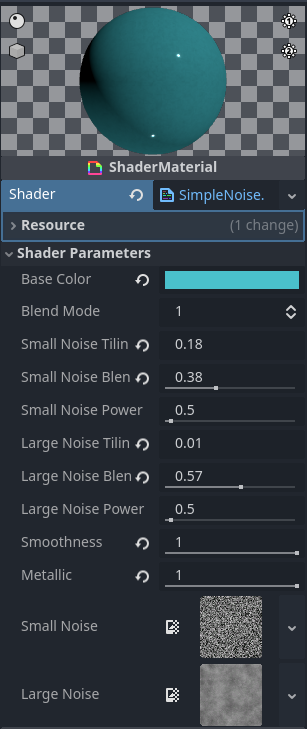
And here is the comparison side-by-side to show off what was achieved:
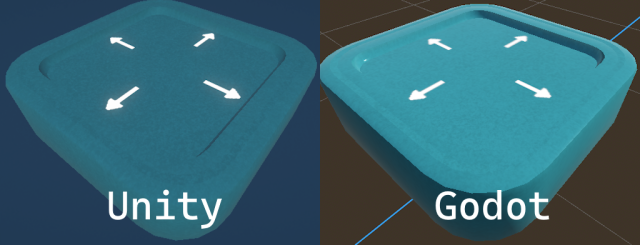
Now there are some obvious differences, most of them have to do with lighting implementation and environment. However with a bit of tweaking I would say this would be damn near spot-on from Unity.
And with this I wanted to show that, even though coming from Unity to Godot will be quite a culture shock and a lot of adaptation and relearning things from scratch, it is possible to do. Shaders is not something I'm good at, but I can program and learning how to translate from one to the other have taught me quite a bit already.
I hope you found this useful :-)