This blog post does not include the complexity of security. The setups posted here are a good start, but always research how to best protect your servers!
Please hit me up on bluesky if you find any glaring issues with this guide as I might have forgotten a step here and there.
Content
- Stacking
- Risks and Considerations
- Domain
- Renting vs Homelab
- LEMP
- Docker and Portainer
- Gitea
- Using a Domain
- Gitea Continued
- NextCloud Office
- Glances
- The World is your Container
- Conclusion
Stacking
As an indie developer production can at times feel very "ductaped together" on various home computers spread across multiple service providers rather than in a more unified space shared among colleagues and friends. However it doesn't have to be this way. You can, for relatively little money, get a server infrastructure together with open source software solutions and a VPS (although I also talk about hosting stuff at home). In this post I'll lay out how I put together a small stack for Star Grease Studio, the indie cooperative I'm starting with some peeps and what each part of the stack is.
This self-hosted stack consists of:
- Nginx - Used for Reverse Proxying our services.
- Certbot - A free tool that lets you generate free SSL certificates.
- Portainer - Our docker management tool of choice.
- Gitea - A fairly basic but flexible Git repository server.
- NextCloud Office - An expansive and incredibly powerful online suite of tools a la Google Drive.
- Glances - (Optional) A quick and easy way to get some resource overview stats for your server.
All of this software is open source and free to host and use. If you have other requirements or maybe even other services you require you can check out this big list of solutions. It's not a complete list, but it does have a lot of options categorized by what they are made for. Maybe you need a helpdesk suite, or a CI/CD pipeline or something third. Up to you once you start self-hosting like this. Just be careful not to get carried away ;-) (Fun fact, this blog is self-hosted on a small Webdock VPS as well! I am using grav to do it)
Note: None of the services, websites or otherwise I link to are affiliated with me and I was not paid to use any of it. It's just what I happened to use or find while doing this.
Risks and Considerations
Before we get started you should know the risks associated with hosting your own stack and there some considerations to take into account as well. As much as it is fun to run your own stack and feel that you are in control, without proper care the stack can fall over easily. The reason some of these tech giants are as good as they are is because they have staff 24/7 to solve problems, tons of redundancies and guarantees. You do get to pay for that though either through your data or your money. That said, getting away from tech giants and getting to host your own stack is also a very useful exercise to learn more about the tech that runs the internet but also just generally for independence.
The most common challenges associated with hosting your own stack are:
- Uptime - If something breaks in your stack, you are responsible for fixing it. You can't call or write anyone else to do that. It's your problem.
- Redundancy - If a system in your stack fails and you lose all your repositories, it's your problem. You are responsible for setting up backup mechanism or hope that your server provider (if you use one) have snapshots that you can load to at least salvage most of what was lost.
- Security - This is a big topic and one I sadly can't cover in this blog post. Basically, hackers and bots are scanning the internet constantly for ways to gain access to servers or data just in case. If something is locked away there must be a reason it's guarded right? So you'll have to be aware that security is a constant arms race and a topic you'll revisit every 4-6 months to be sure your stack is somewhat up to date.
Now additionally if you host your own stack at home, rather than on a VPS or other rented server, you have some more challenges:
- Bandwidth - Your internet will be used as the in and out of your stack which means that if you have high volume traffic you could stress your own hardware beyond what it was made for causing instability. Additionally you might get in trouble with your ISP as some ISPs do not allow you to run a business application like this through a home connection.
- Exposure - If you open any ports on your router to the internet then anyone on the internet can scan your ports and see if they can gain access. Just be mindful that if you have not sandboxed your applications and whatnot properly, then you could expose your entire home network to the world which would be a bad time. There are ways to mitigate this like only accessing public facing services through setting up a Tailscale tunnel at your house. This could also be done on a VPS in cases where you need tighter security.
All of that might sound overwhelming or as if I'm talking against hosting your own stack, but that is not the case. It's just to make you very aware that, what you gain in freedom and flexibility you also lose out on security and service. It's a tradeoff and only you can really know whether that's worth the tradeoff or not. Let's start setting up!
Assumptions
For this particular setup it is assumed that we will be 3-4 users that will make use of the server a few hours a day, nothing too big in terms of traffic however the NextCloud Office instance in particular can be rather resource hungry if you add the various (free) add-ons they offer such as VoIP and full text search (which we did) so the hardware will be upped to match. If you don't make use of all the bells and whistles you can get away with using less hardware.
We will also be using a headless Linux instance (In this case Ubuntu Server, although you could likely set this up on other flavours too) and this setup will require remote access and root terminal access to the system. It is also assumed that you have at least some familiarity with troubleshooting and how to find information when your systems won't start or do as told as this blog post cannot cover all the troubleshooting that might be involved. Lastly, this will need you to use the linux terminal quite a bit, but every command you need to use is listed.
While Security is not something that will be covered extensively, as it's far too big a topic for this blog post, I want to mention that our service provider has configured fail2ban on all server stacks which helps quite a bit with keeping out DDoS attackers and hackers. Something to consider if your provider doesn't have any security in their stack or you are self-hosting at home.
Domain
This is just a personal thing but I prefer having a domain so I don't need to write in IP addresses to get to my server. I bought our domain stargrease.studio over on Namecheap but you can buy the domain from practically anywhere. As long as you have access to configure the DNS settings of the domain then you are good. You can do this without having a domain, but it will make life easier if you have one. If you somehow have a setup that gives out domains locally because you are not running a remotely accessible server then you know what domains you have :-)
Renting vs Homelab
For this particular example I'm gonna use the VPS provider called Webdock. They are fairly cheap for what you get, they are Danish and they do not make use of Amazon, Google or Microsoft for their infrastructure. That's just my personal goal, that is not a requirement. But what it also allows us is to install any Linux ISO we wants and it gives us full SSH access so we can get to the server remotely through a command-line tool. It also provides us with snapshots that we can setup so we can do backups of our server state and lastly it makes sure that my colleagues can always reach the server even if my own network or computers are compromised or down for any reason.
The specifications I got for this VPS are:
- Intel Xeon Gold 6230R 5 Cores / 10 Threads @ 2.10 Ghz
- 12 GB of RAM
- 425 GB of Disk Space
- 1 Gbit of Speed
This server cost me about 250 DKK a month (approximately €33.50 / $38 / £28) which is a bit pricey of course, but you could make a small server profile which includes less hardware if you are fewer users and if you don't expect to use all the bells and whistles that NextCloud Office provides. What they recommend is that you have about 6GB of RAM for the instance if you use all the bells and whistles but closer to 8GB with a couple of users. I upped the RAM to 12 because it gives me flexibility and headroom in case I need to up the processing. RAM and Storage are also quite cheap, followed by Storage. Bandwidth is the pricey part.
I'd recommend getting about 6GB of RAM if you choose not to use all the bells and whistles and you should be more than able to use 3-4 cores. Included with the above purchase I also get 10 Terabytes of outgoing traffic, but that is way above what I'll ever need so there is no problem there. You could get away with a smaller server even if you don't plan on using NextCloud at all. Gitea is a great Git repository that doesn't require a lot of your hardware to run.
However what if you don't have that option? You might be on a really shoestring budget but still wish to self-host your infrastructure and services. There is hope for you, however you do need to adjust expectations. If you only have access to weak hardware then running this stack might be difficult or at least a limited option, however it is still an option, so just keep that in mind.
Personally I have a homenetwork made from various used mini-computers which has worked wonders. You don't need very powerful hardware to run various services you just need adequately powerful hardware. To underline what I mean: My little fleet of mini computers (3 to be exact) consists of hardware that has 6th generation Intel CPUs and DDR3 RAM. Incredibly behind the times compared to todays offerings but they were very cheap off of the Facebook Marketplace and you can similarly find this hardware on eBay and for Nordic users also check out Tradera and DBA. One of the computers I got was a barely used office mini computer that sat in a meeting room, it's designated task being a Skype computer. Once you acquire some hardware you can install Proxmox on those mini-computers which is a Hypervisor. In short terms this allows you to setup any number of Virtual Machines that the hardware can carry (outside the scope of this blog post). You can setup multiple proxmox computers that each run different Virtual Machines and are part of the same pool of machines all in your own little network. So even if you can't rent a VPS like me, you still have the option of hosting something at home.
Some of the computers I recommend looking for are:
- HP EliteDesk 800 G3 - You can find this in various form factors (like Ultra Small Form Factor) and you can find newer versions of the computer too. This is the 3rd generation (G3) but the 4th and 5th Generation versions are also excellent computers to look for to add to a home network.
- Dell Optiplex Micro - There are many versions of this PC but they are usually small form factors and a good starting point for homelabs.
There are many computers out there more than capable of being a home server. It's just a matter of finding out what you need and what you can afford and then get that. I'd recommend checking out Hardware Haven on YouTube. A channel that mostly concerns itself exactly with these topics.
Why do I not recommend Raspberry Pi though? That is usually the goto for most of the DIY and Self-hosting community. The simple reason is that Raspberry Pi is usually way too weak for this type of stack and also price wise it's easier to get good used hardware for little money compared to getting a raspberry pies for the same purpose. It's also not really what the tech was developed for so why live with those limitations when you could get hardware for the same price or cheaper (some times) that does the job better?
Now if you can't buy any hardware at all? Then you can still run this on your own computer! However be advised that of course this means your entire operation is always reliant on you having your computer running and that may or may not be an optimal solution. Your mileage may very.
LEMP
For our purposes we went with the LEMP Stack template that Webdock provides which uses the Ubuntu Server flavour of Linux however you could also do this with Ubuntu Desktop, Debian or some other distribution. Be aware that steps to install the tech stack might just be different though. LEMP stands for Linux, Nginx (Engine-X), MariaDB/MySQL, and PHP and is a fairly standard stack that most server providers will offer (there is also the LAMP stack where nginx is switched out for apache). It gives you an Operating System, a Webserver, a Database and a web Backend which is all very good to get started on most types of applications or server stacks. If you don't use NextCloud Office then you won't need PHP however it is often included as a lot of tech stacks, frameworks and containers make use of PHP so it might be good to just install it anyway.
If you have a configured setup jump here to continue. If you don't have a stack template like that from your service provider, or you are installing it at home, then follow this step by step guide below to setup the LEMP stack (be aware you need sudo access and that I can't help with troubleshooting):
Nginx
- First, open an SSH connection to your server via a terminal or access the computer directly and use the terminal it has. It doesn't matter which you use as long as you have terminal access. The first time you run any command with
sudothe system will likely ask you to provide thesudopassword but shouldn't on subsequent invocations. sudo apt update- We run this command to be sure all our existing packages are up-to-date. This is just good practice in general. If it asks you to update anything go ahead and do so.sudo apt install nginx -y- Then we install nginx.sudo systemctl start nginx- After installation we start nginx to ensure that it was installed correctly. If you see any problems, refer to the troubleshooting guide.sudo systemctl enable nginx- Now we need to ensure that nginx starts with the system so we don't have to worry about that in case of system restart.sudo systemctl status nginx- You should now be able to see the status of the system. It should show you an output similar to this:● nginx.service - A high performance web server and a reverse proxy server Loaded: loaded (/usr/lib/systemd/system/nginx.service; enabled; preset: enabled) Active: active (running) since Mon 2024-06-17 01:35:34 UTC; 1s ago Docs: man:nginx(8) Process: 89789 ExecStartPre=/usr/sbin/nginx -t -q -g daemon on; master_process on; (code=exited, status=0/SUCCESS) Process: 89791 ExecStart=/usr/sbin/nginx -g daemon on; master_process on; (code=exited, status=0/SUCCESS) Main PID: 89792 (nginx) Tasks: 2 (limit: 1061) Memory: 1.8M (peak: 1.9M) CPU: 19ms CGroup: /system.slice/nginx.service ├─89792 "nginx: master process /usr/sbin/nginx -g daemon on; master_process on;" └─89793 "nginx: worker process"
MySQL
sudo apt install mysql-server -y- First we install the latest version of the MySQL Database.sudo systemctl start mysql- Then we start up the database service.sudo systemctl enable mysql- Then we enable it to run on system startup just like nginx.sudo systemctl status mysql- And lastly we can view the MySQL status. Your output should look like this:● mysql.service - MySQL Community Server Loaded: loaded (/usr/lib/systemd/system/mysql.service; enabled; preset: enabled) Active: active (running) since Fri 2024-06-14 01:49:07 UTC; 26min ago Process: 100059 ExecStartPre=/usr/share/mysql/mysql-systemd-start pre (code=exited, status=0/SUCCESS) Main PID: 100082 (mysqld) Status: "Server is operational" Tasks: 39 (limit: 1061) Memory: 293.9M (peak: 380.0M swap: 66.3M swap peak: 66.4M) CPU: 8.781s CGroup: /system.slice/mysql.service └─100082 /usr/sbin/mysqldsudo mysql_secure_installation- We then disable insecure default configurations by running the secure installation script. (Note: If you can't run this script then try and and runsudo apt updateandsudo apt upgradefirst and then try again.)- During this script running you need to take care of a couple of things. When you run the script you might be asked to put in the sudo password again. Do so. Then when prompted to enable the VALIDATE PASSWORD component press
Y. What this does is ensure that database users adhere to strict password policies. - You then put in the desired password strength in the form of a number. Personally I think
1should be more than fine but the options are:- 0 means that you just need a password that is at least 8 characters long or longer.
- 1 means that you must include numeric, mixed case and special characters.
- 2 means the same as 1 however there is also a dictionary of common passwords that won't be allowed.
- When prompted to remove anonymous users on your database server press
Y. - When prompted to Disallow root login remotely press
Y. This is a common security risk which can allow anyone who gains access to wreck havoc on your system. With this in place they won't be able to destroy everything. - When prompted to remove the test database press
Y, unless you wish to use that test database for something before you get rid of it. Just don't put anything important in there. - When prompted to reload the privilege tables press
Yfollowed byEnterwhich will then apply the configuration changes. sudo mysql- Now we can open the MySQL console and setup a new root user password.- mysql>
ALTER USER 'root'@'localhost' IDENTIFIED WITH mysql_native_password BY 'secured_password';- Switch outsecured_passwordwith a strong password you choose and press `Enter . - mysql>
FLUSH PRIVILEGES;- This will reload the MySQL Privileges table and apply your changes. - mysql>
exit- We exit the MySQL console. sudo systemctl restart mysql- Restart the MySQL database server and we should now be good to go.
PHP
Note: PHP is available in the default APT repositories on Ubuntu 24.04 meaning you won't have to add the repositories for PHP manually. The PHP-FPM (FastCGI Process Manager) package enables PHP to run as a service on your server to interact with other applications. The steps below are assuming that you already have the PHP repositories figured out if you are using a different Linux distribution. The steps will go over how to install PHP, PHP-FPM and essential modules like php-mysql so your PHP services can use the database you setup in the previous step:
sudo apt install php php-fpm -y- First we installphpandphp-fpmin one go.sudo apt install php-mysql php-cli -y- Then we install essential modules, one to communicate with your database and one to act as a command line interface for PHP. You may never need to use that CLI however some apps or some installations might.php -v- We should now be able to check our PHP version. You should get output similar to something like this:PHP 8.3.6 (cli) (built: Apr 15 2024 19:21:47) (NTS) Copyright (c) The PHP Group Zend Engine v4.3.6, Copyright (c) Zend Technologies with Zend OPcache v8.3.6, Copyright (c), by Zend Technologiessudo systemctl start php8.3-fpm- Then we start the service. Beware that your version number might be different than 8.3.sudo systemctl enable php8.3-fpm- Then we make sure PHP starts with our system as well.sudo systemctl status php8.3-fpm- Lastly we check the status of the PHP service to make sure everything is running as expected. You should get output similar to this:● php8.3-fpm.service - The PHP 8.3 FastCGI Process Manager Loaded: loaded (/usr/lib/systemd/system/php8.3-fpm.service; enabled; preset: enabled) Active: active (running) since Mon 2024-06-17 01:29:10 UTC; 8min ago Docs: man:php-fpm8.3(8) Process: 89583 ExecStartPost=/usr/lib/php/php-fpm-socket-helper install /run/php/php-fpm.sock /etc/php/8.3/fpm/pool.d/www.conf 83 (code=exited, status=0/SUCCESS) Main PID: 89580 (php-fpm8.3) Status: "Processes active: 0, idle: 2, Requests: 0, slow: 0, Traffic: 0req/sec" Tasks: 3 (limit: 1061) Memory: 7.5M (peak: 8.6M) CPU: 110ms CGroup: /system.slice/php8.3-fpm.service ├─89580 "php-fpm: master process (/etc/php/8.3/fpm/php-fpm.conf)" ├─89581 "php-fpm: pool www" └─89582 "php-fpm: pool www"Now PHP-FPM is running as a system process that uses pools to handle all PHP connections to your server. You don't necessarily need to know what that means, but if you wish to configure PHP-FPM to ensure best performance and access that will be described further down. We do need to check the configuration for one thing however, so keep reading.
ss -pl | grep php- First we need to know the path of the PHP-FPM unix socket which we get by using the ss utility. It should produce output that looks like this:u_str LISTEN 0 4096 /run/php/php8.3-fpm.sock 53024 * 0. We take note of/run/php/php8.3-fpm.sockas this is the PHP-FPM socket path. PHP-FPM will use this socket to communicate with other applications like nginx.sudo nano /etc/php/8.3/fpm/pool.d/www.conf- This will open the configuration file in nano. It is a very small text editor that can run in your terminal. It's a bit confusing to get used to when you first open it, but you just need to know that the application uses a lot of keyboard shortcuts so be careful when you pressCtrlorAlton your keyboard. It might lead to unintended commands. But I will guide you through below what to do. If your system claims it does not know what nano is, simply install it using this commandsudo apt-get install nanoand try again.- Using the up and down arrow keys on your keyboard, find the
[www]directive in the file. Once you found it look at the two entriesuserandgroup. They should read like this:user = www-data group = www-dataAnd if they don't, then you can use your arrow keys, backspace and delete buttons to change the text to read as above. Once you have checked, press
Ctrl+X. This will close the editor. However, if there are any changes it will ask you if you wish to save the buffer first. You pressYto confirm and then you pressEnterto confirm thatnanoshould save the file with the file name it already had. If you regret closing nano simply pressCinstead ofYto go back to writing, or if you just don't want to save pressNinstead ofY. In this configuration there are some other fields you should be aware of if in future you need to change anything:- pm.max_children - Sets the maximum number of child PHP processes that can run at the same time so that you can better control memory and CPU footprint.
- pm.start_servers - Number of child processes created when PHP starts on the server to make an initial pool of PHP processes that are ready to handle requests. The default value is 2.
- pm.spare_servers - Sets the minimum number of idle child processes. Default value is 1 which means if the number of processes is less than 1 it will create a process.
- pm.max_spare_server - Sets the maximum number of idle child processes. Default value is 3 which means that it will stop producing more processes if it attempts to surpass that number.
- pm.max_requests - Enables the maximum number of requests each child PHP process can execute.
UFW
Here at the end there is a step that only matters to people who are running their own servers at home. If you rent a server somewhere there is a high likelihood that your provider has already configured the firewall to let you communicate through port 80 and port 443. The former is the standard port for all unencrypted traffic. The latter is the standard port for all encrypted traffic. So for completeness sake here below is how to open ports and how to instate basic protection through your firewall. In order to open up these ports run the two following commands:
sudo ufw allow 80/tcpsudo ufw allow 443/tcpThis will open up the firewall for TCP traffic on port80and443. ufw stands for Uncomplicated Firewall and is installed by default on Ubuntu systems however if it isn't you can install it via the commandsudo apt install ufw. You can then configure the firewall further:sudo ufw app list- This will list the available rule profiles thatufwalready has available. You should see something like this:Nginx Full Nginx HTTP Nginx HTTPS OpenSSHsudo ufw allow 'Nginx Full'- We'd like to enable theNginx Fullprofile.sudo ufw reload- For changes to apply we need to reloadufw.sudo ufw status- We can then check the status of the firewall. You should get something like this:To Action From -- ------ ---- 22/tcp ALLOW Anywhere Nginx Full ALLOW Anywhere 22/tcp (v6) ALLOW Anywhere (v6) Nginx Full (v6) ALLOW Anywhere (v6)And that should be the last step to have a LEMP stack installation from scratch.
Docker and Portainer
We have our Server, we have our server stack and now we need to actually start installing the stuff we need to run our services. As described earlier that includes Docker, Portainer, Gitea, Nextcloud and (optionally) Glances. To get started we'll install docker because it will be running our entire service stack. So to install docker you can follow this guide found on Docker's official website: https://docs.docker.com/engine/install/ubuntu/#install-using-the-repository . It should take you to the section called "Install using the apt repository". There are three steps however quite a few commands to run to get it setup. But once you are done, come back here and we will continue.
So now that we our foundational service, we will install our docker management tool. In my case I went with Portainer. It's fairly simple to use, powerful and while it has a Business Edition (Portainer BE), the Community Edition (Portainer CE) is more than plenty for what we need. In case you need to get the Business Edition though, if you are in a bigger company who needs business support and better reporting, you can find both on this page here: https://www.portainer.io/install . But for our purposes we will go with Community Edition and to help you out I've linked directly to the relevant installation process: https://docs.portainer.io/start/install-ce/server/docker/linux#deployment
After installation you can access the Portainer web interface through https://localhost:9443 (unless you changed the port). However localhost really only works if you are on the same network as the server. If you are running this off of a VPS or some other rented server then you are obviously not going to be on the same network as the server. So to get around this you change the URL to https://your_servers_ip:9443 where "your_servers_ip" is the IP of your server (without quotes) and put that in your browser instead. If you run into certificate issues you can simply push past that and go to the site anyway. If you are running this on a local server in your own network then you could access it via localhost or whatever other local ip your server has. What's important is that https is used and that we include the :9443 port number at the end. We will fix the need to use that port number later as well as point this to a domain, if you have a domain you can use.
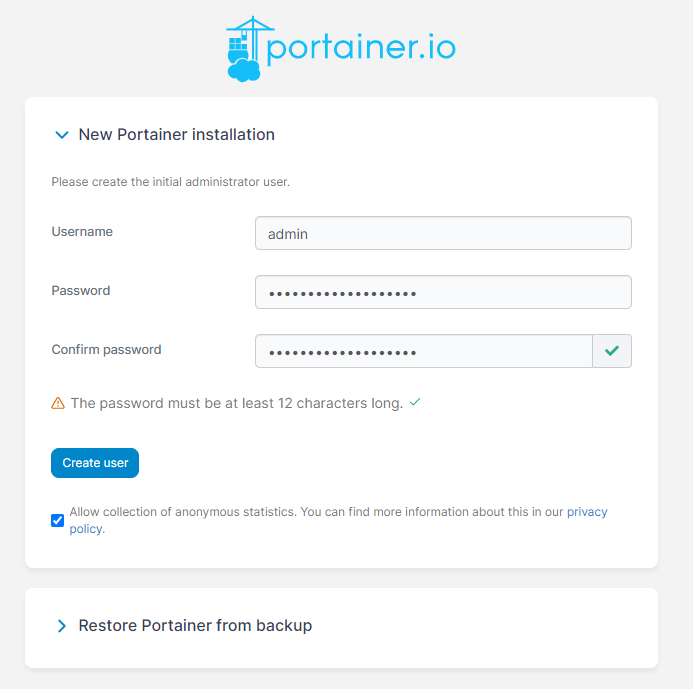
The first time you open the link you will be presented with an installation screen. It just needs you to make an admin user and a password but be sure to save this somewhere so you can login again later as without this you can't really access your portainer instance. Here you can choose whether to send anonymous user data to the portainer team or not by checking the box. You are not required to do it, it's optional.
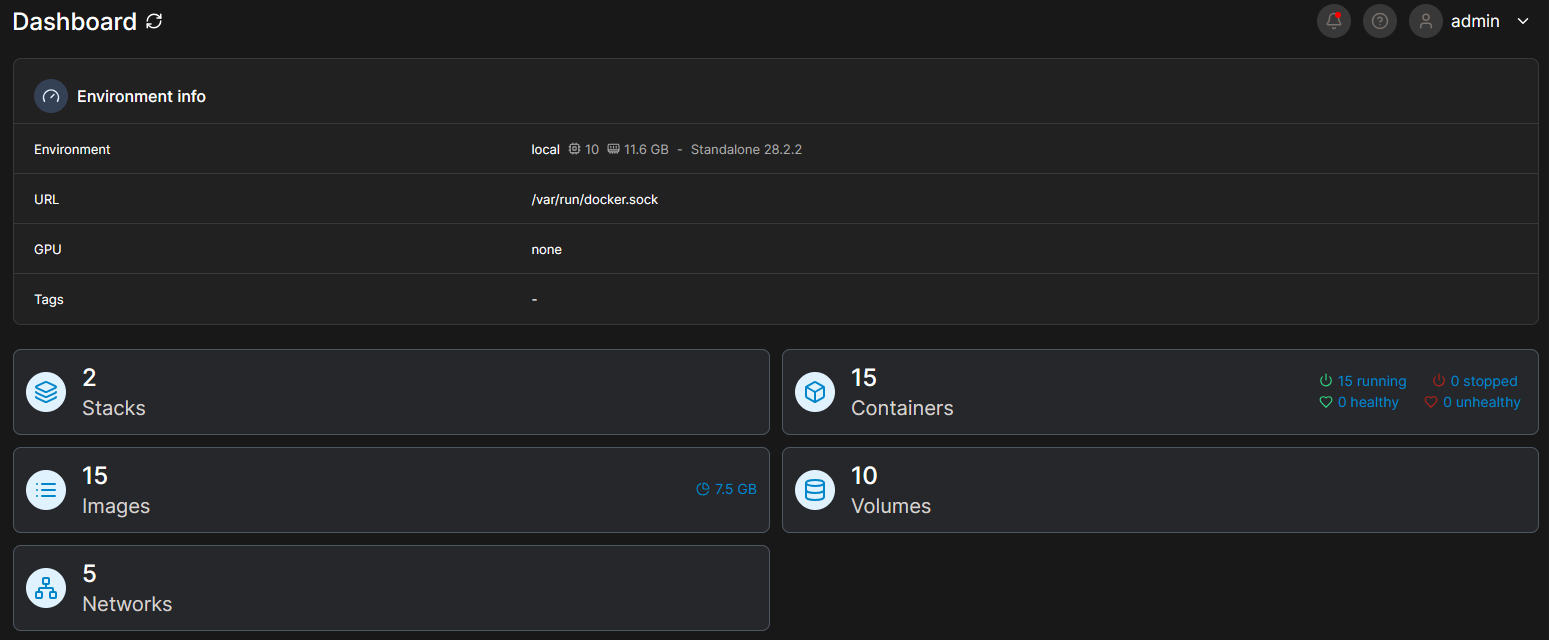
When you get to the next picture after making your account you will be presented with a Quick Setup screen. It has two big buttons, one being "Get Started" and the other being "Add Environments". Click the "Get Started" button so you get a default setup. You will then be shown an "Environments" page which should only have your local environment running. If you click it you will be shown the Dashboard for your environment. Here you find various buttons you can press to see information about your environment. Press the Containers button. Here you will see all the docker containers that are currently running. Right now we should only see the portainer container as portainer itself is also a docker container.
As time goes on and you add more containers, need to troubleshoot them, etc. you will get intimate with this UI but that is beyond the scope of this blog post.
Gitea
With our foundation ready it's now time to install Gitea, the self-hosted git repository server so we have a place to store all our code and assets for whatever game projects we are doing (or just software, or whatever else really! It's git, you can store whatever you want!). To install this one of the easiest ways of doing it is using something called docker-compose. It's a convenience tool that was made to ease the setup of containers by turning their environment arguments, rules, needs and conditions into yaml files that docker could then consume and setup the container as you requested for you. It's a lot easier to maintain too because otherwise every time you took down a container to setup a new one you'd need to write out very long docker commands with all variables included. With this, you can just edit a text file and then tell docker to execute the configuration. Easy!
One problem though, docker compose would require us to sit and write files by hand in the terminal which takes a while and is cumbersome. Would be easier if we just had a text editor right? We are in luck because Portainer got us covered. In Portainer there is the concept of "Stacks". A stack in portainer is more or less what it sounds like. You make a stack of services, containers or whatever you need like you would a docker compose file and then you ask Portainer to set it up for you (hey we want that!). So while you are on the Portainer web ui, look out to the left on the screen. You should see a menu and one of the menu items is "Stacks". Clicking that button takes you to the Stacks screen where up to the right you see a blue button with the text "+ Add Stack".
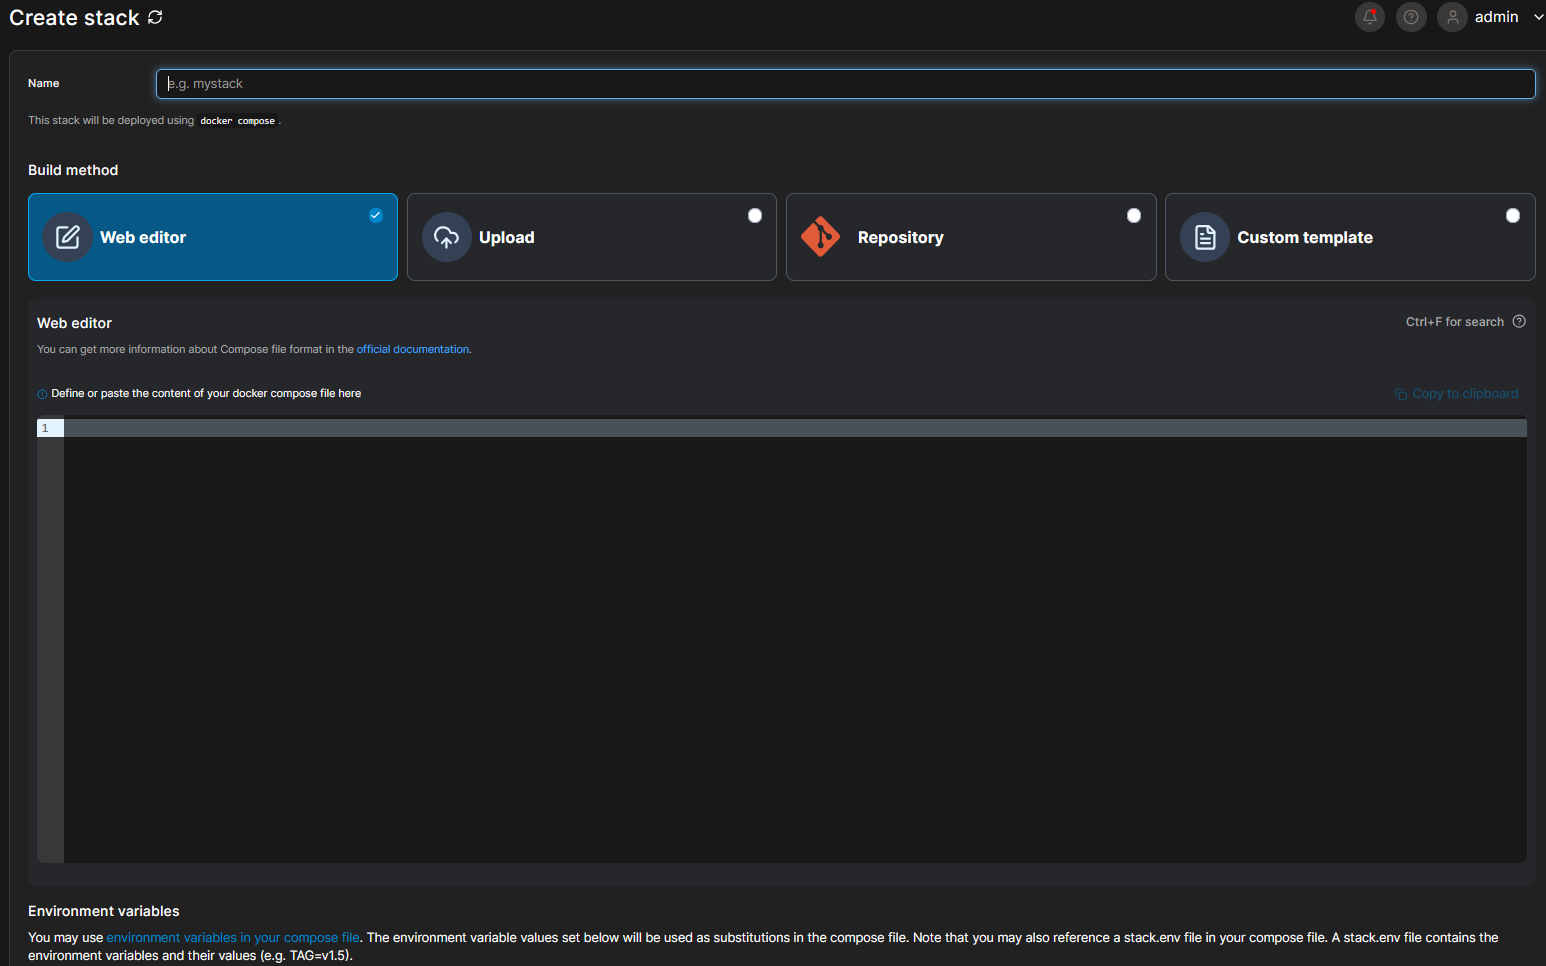
When you click it you are presented with a screen that has a field to give the stack a name (I wrote gitea for that so I know what it is) and then you have a choice to make. Will you do this via the Web Editor, upload a Compose file, get the compose file from a repository or make a Custom Template? In our case we simply want to use the Web Editor which is picked by default. However if you wanted to just upload a file the option is there and if you want Portainer to get the file from a repository because you maintain many composer files this way then the option is also available. The Custom Template button is for if you sit and make templates for docker compose files but that's beyond the scope of this blog post.
Now we are not going to go over the complexities of a docker composer file or how it's structured as such. Some of what you are about to see below is intuitive and some of it just won't be unless you know what the docker composer file expects. However, I have already gone through the trouble of figuring out how to make it work, so you don't have to be an expert to get this running. So in the big text window you put in the following code (NOTE: As of writing, June 2025, the version of gitea is 1.23.8. By the time you read this the version might have changed. Check out the official repository to see what the newest version is and update the number accordingly in this docker compose file):
version: "3"

networks:
  gitea:
    external: false

services:
  server:
    image: docker.gitea.com/gitea:1.23.8
    container_name: gitea
    environment:
      - USER_UID=1000
      - USER_GID=1000
    restart: always
    networks:
      - gitea
    volumes:
      - ./gitea:/data
      - /etc/timezone:/etc/timezone:ro
      - /etc/localtime:/etc/localtime:ro
    ports:
      - "3000:3000"
      - "222:22"
This will download the latest docker container, setup local users (as containers are little sandboxes), set that the container will always restart if it dies, what networks it's using internally, what folders it's using (and what folders it's bound to on your actual server) and lastly what ports it uses to communicate outwardly in the format public facing:inner port. So your server needs to use port 3000 and internally docker will route those calls to the internal 3000 port.
Scroll to the bottom of the page and click "Deploy the Stack". Once you do that, Portainer will do everything it needs to do in order to setup the container and setup it's environment as well for you. Once it's done you should be able to go back to your container list and see it there! If you ever need to update the compose file in future, you go back to the Stacks screen, click the name of the stack and then at the top of the page is "Editor". Changing the code in the compose file and followed by clicking "Update the stack" under the editor window will then update and redeploy your container. Very convenient! You can have any number of stacks and it's extremely flexible and nice to have the ability to setup, update and teardown containers like this on demand. Compose files can be infinitely complex and have any number of layers of containers within containers, networks, volumes, etc. So it's an incredibly useful tool!
After installation it's time to go set up the actual git server. Although, this might be a good time to take a small detour to setup nginx to allow us to use a domain so we don't have to fiddle with IP addresses and ports when we access our stuff. So we'll do that first.
Using a Domain
Using a domain is easier to remember, is easier to write and also makes you able to generate SSL certificates that can encrypt network traffic on your site which is the standard that is expected nowadays. Most modern browsers will actively stop you from accessing websites that uses http instead of https and some might let you go on at your own risk, but some won't. Firefox is known to stop you from accessing http sites but it will let you pass anyway if you wish.
We need to change your domains DNS and then we need to do some setup in the nginx configuration files. You'll have to do this multiple times so I'm sure you'll get quite familiar with it and we are gonna be making use of a concept called Reverse Proxying. What it means is essentially that whatever request comes from outside of our network will be caught by nginx and then routed to our localhost addresses automatically. Any response from the server will then be sent back to the one who made the request. Why do this, you might ask? It allows us the flexibility to route any incoming client requests exactly as we want as the client will not know what the internal setup of our server is and won't have to know. Nginx will catch that a request is coming from a specific domain and then route that call to a specific local address and port. It also means we can have tens, hunreds or thousands of internal services running on the same localhost address (192.168.0.1, 0.0.0.0, 127.0.0.1 or 10.0.0.1) that each have a different port they use to communicate and we can point our domains to any one of them as we wish. Lastly, we can write any number of allow and deny rules for these configurations too so that we can control access as much as we need.
Whatever domain provider you have will likely do things differently. Although almost all of the domain providers have some kind of guide to how the provide DNS settings. The thing that's important here is that you need to add a record to your domains DNS settings:
- Type: A Record
- Host: git
- Value/Ip: your servers external IP
- TTL: Automatic
And while you are at it, let's do the same for portainer:
- Type: A Record
- Host: portainer
- Value/Ip: your servers external IP
- TTL: Automatic
Once you save that it might take a few minutes for the changes to take effect, however this should now give you two subdomains. So if you own the domain "mycoolsite.com" then you'd now have the subdomains git.mycoolsite.com and portainer.mycoolsite.com. But this only points to your server. These changes don't actually do anything yet. For that we need to change the nginx settings. However if you wish to add even more subdomains, it would be good to do so now. I'd recommend adding a record for nextcloud and one for glances as well if you plan to include both in your stack. If you are going to host your website on this server too, then you should also add a www record.
When you are done with that, open the terminal to your server. If you are hosting this server on your personal network you have to be very aware that exposing ports through nginx and your firewall will expose your network to the internet which has all the risks and upsides that follow. In order to make this less risky, I'd suggest looking into setting up a Tailscale VPN tunnel so that you can access the network at any time from outside if you have a VPN. This way you only have to expose port 80 to the world, which can't easily be exploited as everything goes in and out of that port anyway.
In the terminal we have to make use of nano again to change the configuration files:
sudo nano /etc/nginx/conf.d/default.conf- This should open the default configuration. If there isn't one, nano will read "[New File]" at the bottom but that's okay as we will need a clean new file anyway. Once you start writing, you can exit and save it as earlier by pressingCtrl + X, followed byYfollowed byEnter.- In this new file you need to write the following
map $http_upgrade $connection_upgrade {
    default upgrade;
    '' close;
}
The quotes before the word close are single quotes (') not double ("). This declaration makes it so that when you attempt to request a webpage from http then nginx will attempt to upgrade the connection to https if it can.
- Make a new line under this declaration and write the next declaration:
server {
    server_name portainer.mycoolsite.com;
    location / {
        proxy_pass http://localhost:9443;
    }
}
Where the "portainer.mycoolsite.com" address is switched out for whatever domain you made yourself.
- Now press
Ctrl + X, followed byYfollowed byEnterso you are back in the terminal and our changes have been saved. The server declaration you see there is a fairly standard way to tell nginx about a domain and where to lead a request when it comes in from a client. sudo snap install --classic certbot- Now we install certbot. Certbot is a simple tool you can use to issue free SSL certificates so websites can be visited with https. If you have a server provider then this is likely already installed for you, however if you run on a home server you have to install it. It is required that the server has access to the internet through port 80 in order to contact the challenge server and issue the SSL certificate. The access to port 80 can be closed after acquiring the certificate if you need to.sudo ln -s /snap/bin/certbot /usr/bin/certbot- This command is run to test and see if the Certbot command can be run. If it fails you might have to troubleshoot.sudo certbot --nginx- With this we can now run the actual tool. It will go through your nginx configs and find all the domains you put in there. Since we should only have 1 domain in there it should show us only 1 domain to apply a certificate to. Tell the tool to make a certificate for that domain and wait. If all goes well it should tell you that it successfully created a certificate and applied it to your domain. You can see what certbot put in your config by runningsudo nano /etc/nginx/conf.d/default.confand read. Whatever sections are marked# managed by certbotare sections you should not touch at all. It will likely break the SSL setup. Certbot might tell you that the nginx config is not setup properly and to figure out what's wrong you can runsudo systemctl status nginxto see what the console tells you about the error. Usually it's just typos.sudo nginx -s reload- If all is good you can run this command to reload the nginx config as without doing that your changes won't apply. If it doesn't work you will see an error message. If it does work you'll just see the command line again.
And now you should be able to go to https://portainer.mycoolsite.com and see your portainer instance! No ports needed, no IP needed. Nginx now routes the requests for you. We are going to do the same for your git, nextcloud and glances instances. To help you out, here are the sections you should add to your config so we can finish setting up gitea (remember you can open the file with nano using the following command sudo nano /etc/nginx/conf.d/default.conf):
server {
    server_name git.mycoolsite.com;
    client_max_body_size 8196M;
    location / {
        proxy_pass http://localhost:3000;
    }
}
This section just needs to go anywhere there is space but try and keep it organised for your own benefit. Now press Ctrl + X, followed by Y followed by Enter so you are back in the terminal and our changes have been saved. Follow that up with the sudo nginx -s reload command and be sure that the changes work! Once that is confirmed we setup a certificate for the site as well using the same command we did before sudo certbot --nginx but this time choosing the git subdomain. Once that's done , you should now be able to access the gitea instance via the subdomain you created. If you still have trouble, simply change the address in the browsers bar to http://your_server_ip:3000 and see if it will let you setup. Some times the very first setup is a bit odd, but it should be possible to access the site with this or with https.
NOTE: Certbot certificates only lasts a month at a time. So if your server provider does not provide a scheduled way to update your certificates (by running sudo certbot --nginx and then just updating all certificates) then you need to find a way to set that up. This is the same whether you run the server locally or remotely. However most rented servers do have an automatic option to update certificates for you. One thing you can look into there are called Cron Jobs although that's outside the scope of this blog post. Most server providers have a way to setup cron jobs or some other mechanism to do scheduled tasks automatically.
Gitea Continued
Before we continue with Gitea, we need to create a database and database user for gitea to keep things tidy. If you are using the same provider that I do then you can easily create a new database user from the providers dashboard and you should also be able to run a Server Script which makes the database remotely accessible. Other providers might similarly help you out there if they have a database access panel. If this is the case, make a database called gitea and make a user with access to that database called remotegitea. But if you are setting this up at home then while you are in the terminal:
sudo mysql- First we open up the mysql console.- mysql>
CREATE DATABASE gitea;- This will just create a database for gitea specifically. We don't have to add any tables as the Gitea installation will do that for us. - mysql>
CREATE USER 'remotegitea'@'localhost IDENTIFIED BY 'password';- Here we create the user that our gitea instance will be using and tie it to the localhost domain. Remember to replace the wordpasswordwith a strong password you made yourself. - mysql>
GRANT ALL ON gitea.* TO 'remotegitea'@'localhost';- Here we grant the gitearemote user all privileges to the gitea database. - mysql>
FLUSH PRIVILEGES;- Lastly we apply all changes to our database. You can then exit the mysql console with theexitcommand.
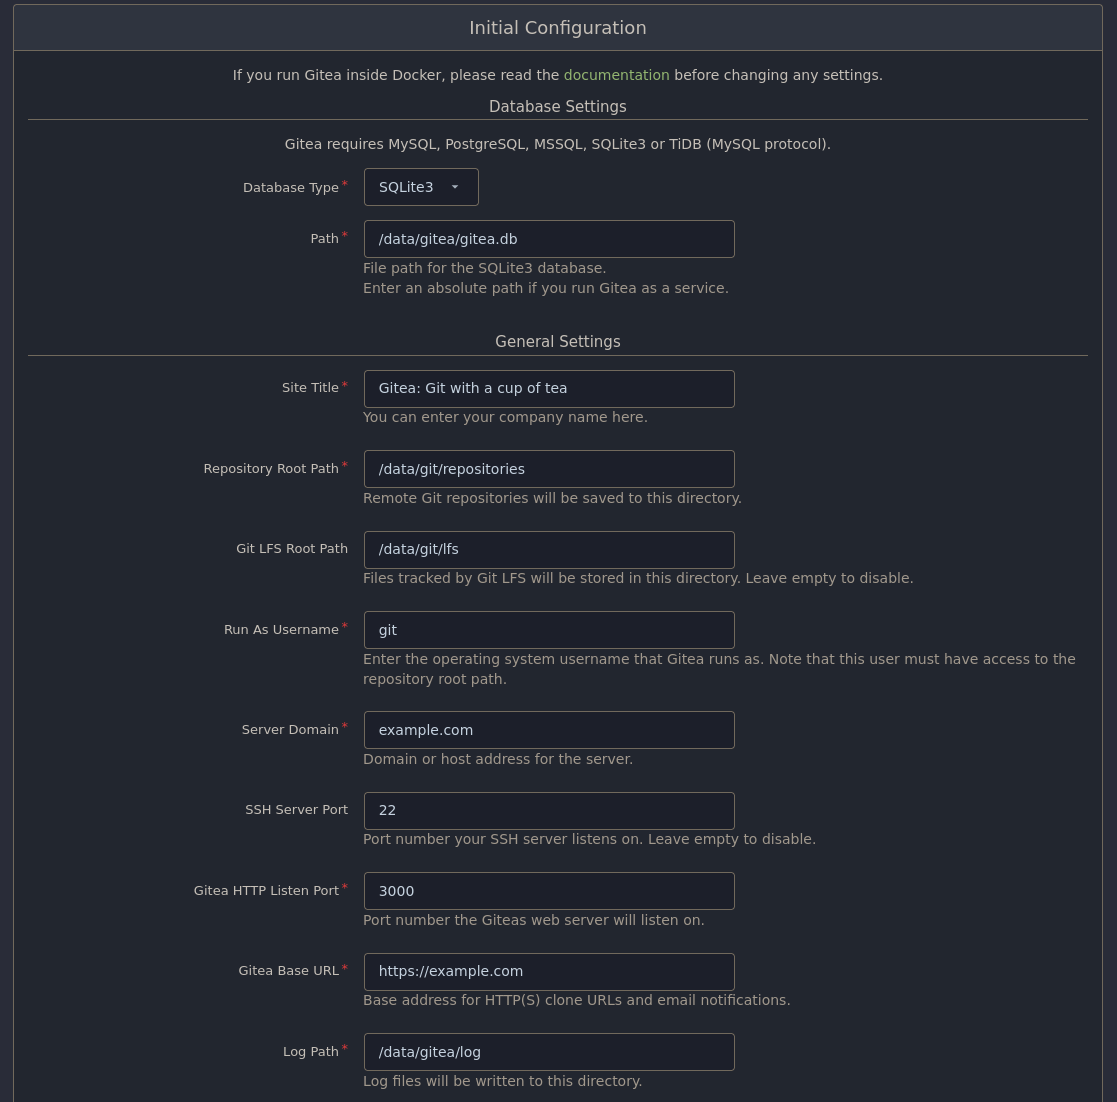
With that setup we should now be able to go to the gitea installation page from the previous section. There are quite a few fields to fill in on the installation page. The fields we care about are:
- Database Type - Set this to MySQL. When you do the page layout will change a bit and add some additional fields.
- Host - Here you type in
<your_server_ip>:3306. This IP must be the external facing one as the container won't be able to reach it otherwise. If you installed the MySQL database as part of the gitea container instead then you should be able to reach the database from a local IP address inside the container. - Username - Type in
remotegitea. - Password - Type in the password you made for the
remotegiteauser. - Database Name - Last we type in
giteawhich is the name of the database we made.
- Host - Here you type in
- Site Title - Call this whatever you want. I called mine Star Grease Studio Gitea.
- Server domain - Here you put in your domain. The example we had earlier was mycoolsite.com but you should put in the domain you got. If you don't have one, put in
localhost. - Gitea Base URL - Here we put your Subdomain. So the example would be https://git.mycoolsite.com. If you don't have a domain put in
http://localhost:3000/. After this you have some Optional Settings for an SMTP server so your gitea server can send emails to you. This is a useful functionality however this blog post will not cover how to setup an SMTP server as it goes beyond the scope of what we need to setup here. You can setup an SMTP server later though so that your can receive emails from your gitea instance. Under the SMTP options is an extra foldout menu labled "Administrator Account Settings". Here you should setup an admin account and password for gitea so that you can login after installation and setup users, settings and what else you might need.
After all that, press Install Gitea. This should setup the rest that you need and in no time you should be able to access the Gitea landing page. If this fails it's likely the MySQL setup and for that you might have to do some troubleshooting to ensure that the database you are using is remotely accessible or locally installed as part of your container and set up properly. From here you can sign in with your admin account to gitea in the upper right corner from the landing page and then start setting things up. Here are some settings I'd recommend:
- Disable Registration - Seeing as this is your company's private repositories we'd like to be sure that no one can create their own accounts, only the admin should be able to make new accounts to keep things under control. To do this, we need to access the gitea config files on your machine via the terminal:
sudo nano /data/compose/1/gitea/gitea/conf/app.ini- First we open the gitea config file in nano. Because we have a volume setup we can see into the gitea docker containers storage as the docker container is using our storage as it's own. Without volumes setup this way, that would have been impossible. In here you can set a bunch of options so if you did something wrong earlier, this is where you go to fix it.- Once the file is open use the arrow keys to scroll down until you find
[service]. To disable registration you need to changeDISABLE_REGISTRATION = falsetoDISABLE_REGISTRATION = true.
- Hide Repositories from people without an account - While you are in this file you can also disable a users ability to see any repositories or explore the repositories without an account should you wish to. This effectively means that there is no difference between a public and private repository to your organisation. You can also forego changing this in case you want to share certain repositories pubicly like you would on services like Github. To maket the change go and change
REQUIRE_SIGNIN_VIEW = falsetoREQUIRE_SIGNIN_VIEW = true. You can also go down further and hide the option of using OpenID Sign In if you wish. It's fine to turn off if you have no idea what it is either. Find the[openid]section and change thisENABLE_OPENID_SIGNIN = trueto thisENABLE_OPENID_SIGNIN = false.
With one or both changes made, you can now save the file by pressing Ctrl + X, followed by Y followed by Enter. With all that done you should be able to restart the container from the terminal as well by typing in sudo docker restart gitea. If that doesn't work or you prefer using the portainer gui, go to your portainer instance, go to your container page and to the left of your gitea container, check the little checkbox and up to the right pick "Restart". And with that you should now have a good to go instance where you can setup accounts and only those who need to see the repositories can!
NextCloud Office
Okay, that was a mouthful but now we are on to the last piece of this infrastructure puzzle, the NextCloud Office instance. This truly is a marvel of open source software as it allows you to have a Google Drive equivalent, including storage, documents, sheets, presentations, drawing programs, whiteboards, etc. and multi-user simultaneous editing. Just like an enterprise solution, but for free. Setting up something as complex as this software though will be a bit more involved as we need to setup some configuration in our nginx file to make it possible. However once we have the container setup NextCloud will automatically install and setup all required containers which is rare blessing in open source software to have something so complex just done for you.
We are going to be following the instructions found here if you wish to read some more in-depth about the setup: https://github.com/nextcloud/all-in-one/blob/main/reverse-proxy.md First we need to dive into the nginx configuration files because we have a server declaration we need to make. If you have a domain and haven't set up a subdomain for nextcloud already at this point, I'd recommend you go do that now. In the domain DNS settings add the following record:
- Type: A Record
- Host: nextcloud
- Value/Ip: your servers external IP
- TTL: Automatic
I called it nextcloud but you can call it whatever you want. And then we dive into the configuration in the terminal:
sudo nano /etc/nginx/conf.d/default.conf- First we open the configuration file in nano. Then use the arrow keys to scroll down to a free space where you can make a new section.- And there you need to write in this server declaration (while it's tempting to copy and paste it, I urge you to go over it line by line just so you know where anything is, should nginx not accept the configuration):
server {
    if ($scheme = "http") {
        return 301 https://$host$request_uri;
    }
    if ($http_x_forwarded_proto = "http") {
        return 301 https://$host$request_uri;
    }

    listen 443 quic reuseport;
    http3 on;
    quic_gso on;
    quic_retry on;
    add_header Alt-Svc 'h3=":443"; ma=86400';

    proxy_buffering off;
    proxy_request_buffering off;

    client_max_body_size 0;
    client_body_buffer_size 512k;
    http3_stream_buffer_size 512k;
    proxy_read_timeout 86400s;

    server_name <your subdomain>;

    location / {
        proxy_pass http://127.0.0.1:11000$request_uri;

        proxy_set_header X-Forwarded-For $proxy_add_x_forwarded_for;
        proxy_set_header X-Forwarded-Port $server_port;
        proxy_set_header X-Forwarded-Scheme $scheme;
        proxy_set_header X-Forwarded-Proto $scheme;
        proxy_set_header X-Real-IP $remote_addr;
        proxy_set_header Host $host;
        proxy_set_header Early-Data $ssl_early_data;

        # Websocket
        proxy_http_version 1.1;
        proxy_set_header Upgrade $http_upgrade;
        proxy_set_header Connection $connection_upgrade;
    }

    ssl_early_data on;
    ssl_session_cache shared:SSL:10m;

    ssl_ecdh_curve x25519:x448:secp521r1:secp384r1:secp256r1;

    ssl_conf_command Options PrioritizeChaCha;
}
A lot is happening here but essentially this is what the declaration does:
- It sets up some error handling to ensure that if we meet a page we don't know, it'll be able to redirect you.
- We setup a port 443 listener (so encrypted transport) for something called quic. This technology is an attempt at using the speed of UDP while still having the stability of TCP. We don't need to understand the implementation details however it is a data layer that should enable faster websocket streams which is useful for video, voice, simultaneous document editing and upload/download.
- We remove the ability to request buffering as we don't need buffering for this application.
- We set the stream buffer size and timeout to prevent eternally hanging connections in cases of errors or broken connections.
- On the
server_nameline you put in your subdomain (so in the example we used before that would be nextcloud.mycoolsite.com but you should put in your subdomain instead). - In the location declaration we get nginx to decorate our requests with a set headers that nextcloud needs and then ensure that we can use websockets behind a proxy.
- Lastly we change some settings for SSL encryption so that it follows the formats and session times that NextCloud expects.
- Now after setting this all up you have to save the file and close it by pressing
Ctrl + X, followed byYfollowed byEnter. sudo certbot --nginx- Now we need to setup the SSL certificate for our nextcloud subdomain. As you've done this a couple of times now so we do it here as well. Choose the new subdomain, press enter and wait for it to successfully apply. If there are trouble here it might have to do with listening for 443 or SSL and if that is the case, go ahead and open the file again with nano and put a#in front of any line it complains about (this comments the line out so it is ignored), save the file and certbot again. You might have to do this one line at a time until it works. Once it works, go back in the file and remove the#you put in to reinstate those lines and then runsudo nginx -s reloadto apply the changes. This should be all you need to do in order to setup the access to your nextcloud.- Now to start the container, go to your trusty terminal and paste in this big command (which also illustrates in general why we prefer docker compose files):
sudo docker run \
--init \
--sig-proxy=false \
--name nextcloud-aio-mastercontainer \
--restart always \
--publish 8080:8080 \
--env APACHE_PORT=11000 \
--env APACHE_IP_BINDING=0.0.0.0 \
--env APACHE_ADDITIONAL_NETWORK="" \
--env SKIP_DOMAIN_VALIDATION=false \
--volume nextcloud_aio_mastercontainer:/mnt/docker-aio-config \
--volume /var/run/docker.sock:/var/run/docker.sock:ro \
ghcr.io/nextcloud-releases/all-in-one:latest
This command will setup two containers. One is for installation and the other is a domain checker. The domain checker can be removed once we are done installing NextCloud Office. What we are more precisely installing is their "All-In-One" interface. It is by far the easiest way to install this suite with docker and will give us plenty of options to enable and disable whatever bells and whistles we want in a neat little installer web gui.
- Now with that setup go to this address: https://your_server_ip:8080 where
your_server_ipis the externally facing ip of your server. You have to do this via an IP and not a domain as otherwise the domain checker might simply block your request. If this doesn't seem to work you might have to access via port 8443 instead of 8080. There is a guide on the official page here with pictures in case you wish something more visually confirming as well: https://nextcloud.com/blog/how-to-install-the-nextcloud-all-in-one-on-linux/. Just scroll down to Step 4 as that is where you would be at in the process. - You will first be greeted by a page that reads Nextloud AIO Setup. In this box you will see a password consisting of a list of random words. You need to copy this password as you will not get to see it again. Once you have copied that password, press the Open Nextcloud AIO login button.
- In the next image you see a field where you put in the password you just copied and press Log In. This will authenticate your domain for NextCloud.
- You will then see an installation screen whith a title text called "New AIO instance". In the domain box you type in your subdomain. In the example it would be nextcloud.mycoolsite.com but you should put in your own subdomain and click Submit. If everything is setup correctly you should be able to pass on to the next installation step.
- On this screen it might ask you if you wish to upgrade from AIO Hub 9 to Hub 10. First say yes to do this so that we are on the newest installation hub possible. This might take a bit but should update the page automatically for you.
- Once that's done you can see all the optional addons below. The things you need would be Collabora (unless you only want storage and don't want the office components at all but that would defeat the purpose of the setup). If you want all the bells and whistles you should enable Fulltextsearch and NextCloud Talk although you can browse the options yourself and make your own decisions too. At the bottom you should be able to put in your timezone as well.
- Once everything is configured to your liking you press the "Start Containers" button. This might take a while as NextCloud will tell docker what containers to get, how to set them up and run them for you. When you are done your Portainer instance will have several new containers all related to nextcloud but they should be clearly labeled for that.
- The next page will show you the status of the containers as it happens. Once they are all green you will be shown a username (usually 'admin') and then a long auto-generated password string of letters and numbers. Make sure you copy that password and then press Open your Nextcloud.
- You should now be shown the login page and can log in using your admin account. From here you can configure your NextCloud instance, make new users, setup groups, etc. By default no one can make users themselves for NextCloud so you don't have to worry about that. You should also go to the admin account page and change the password to a different one.
And that should be it! Now you have a Git Server and an Office Suite in your own personal little cloud. Now you can setup accounts, permissions, and everything else you need. NextCloud has a rich ecosystem of addons (although be mindful of system resources) and many things you can tinker with.
Be aware that if you make use of the Whiteboards in NextCloud, there is a potential issue you need to fix. Basically Redis, the database solution that is installed for production environments, can run into issues in cases where there isn't enough memory to run the service. For whatever reason, the default setting is to not allow Redis to overcommit in low memory environments. This can cause data loss. Go to this github issue to learn more. To solve it, see below.
echo "vm.overcommit_memory = 1" | sudo tee /etc/sysctl.d/nextcloud-aio-memory-overcommit.conf- Run this to put the right value in the config folder that NextCloud makes use of.sudo sysctl "vm.overcommit_memory=1"- Run this for the change to apply immediately. Otherwise you have to restart your server for the change to take effect.- Find the
nextcloud-aio-rediscontainer in your Portainer overview, mark it's checkbox out to the left and go to the top of Portainer to restart the container. This should solve the problem.
Glances
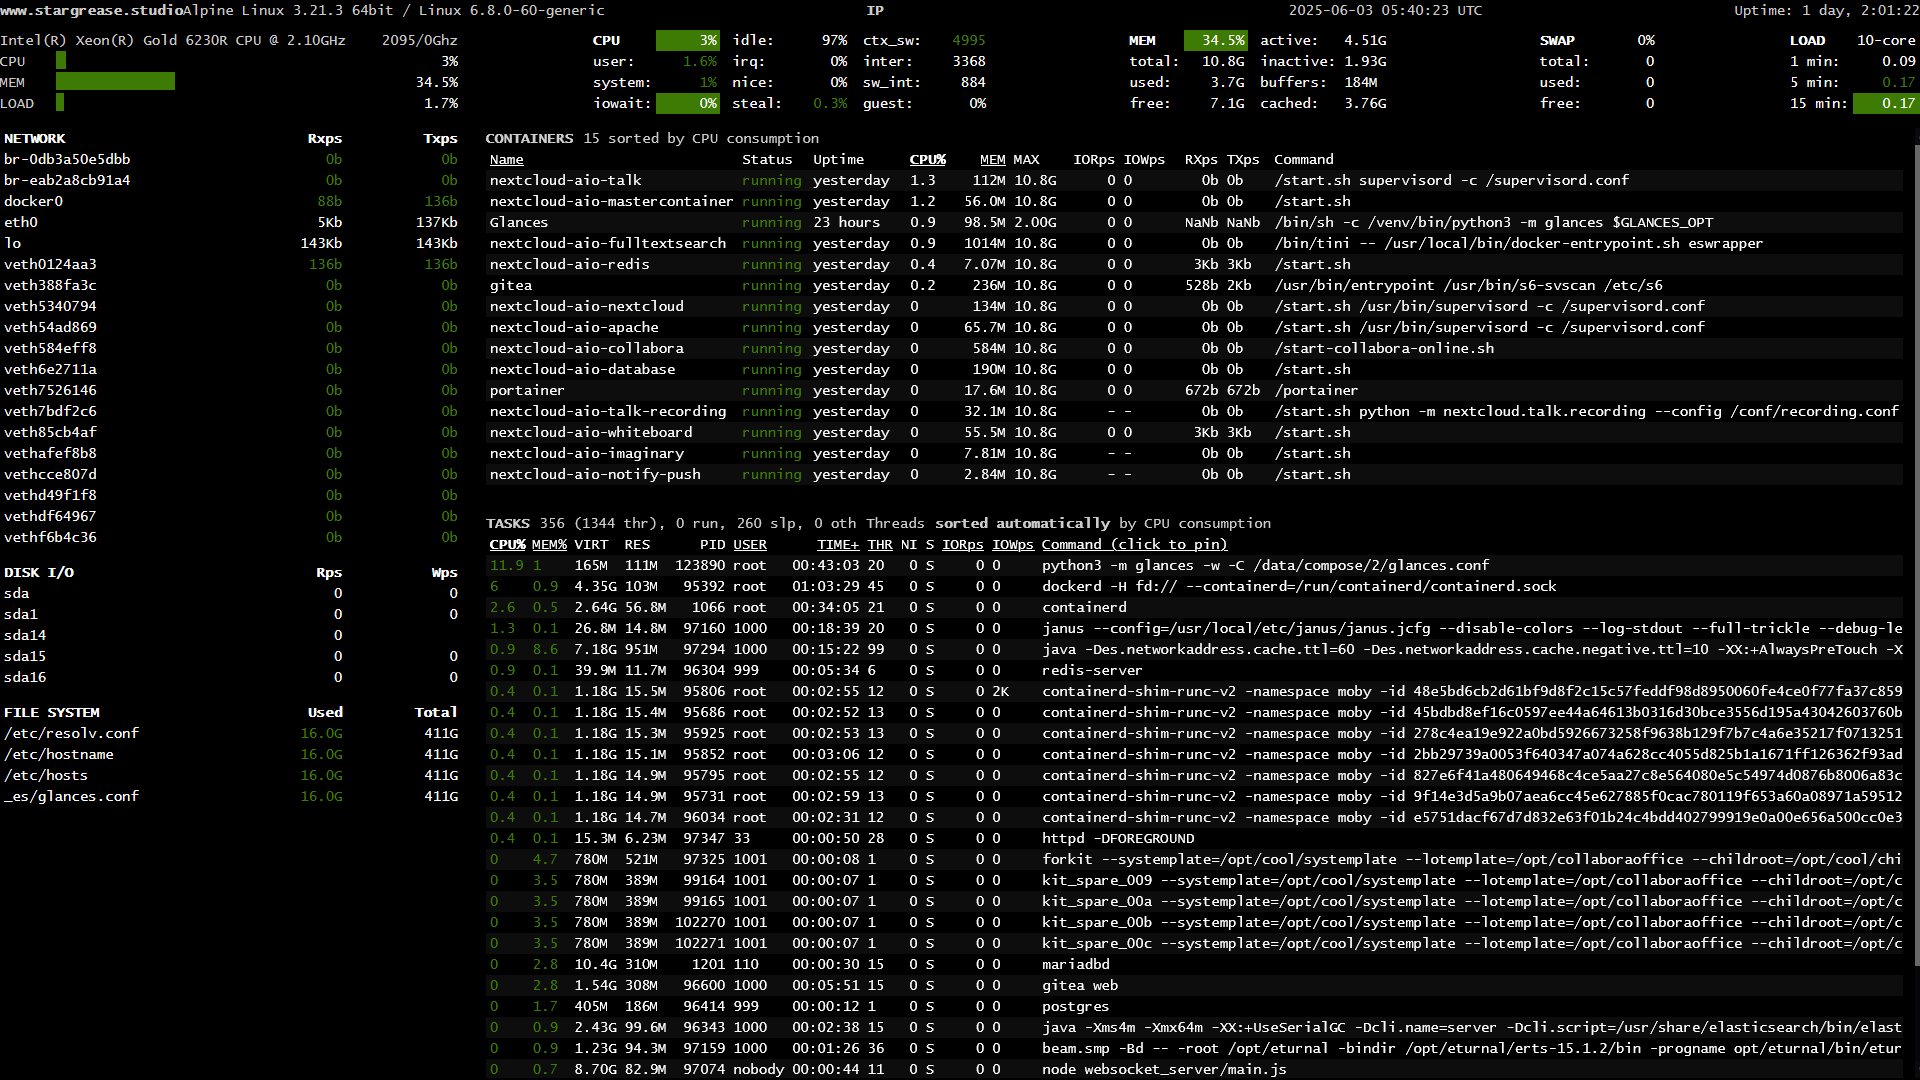
This is an optional step which you can skip if you don't want a resource monitor. It is not needed unless you like to nerd with hardware and numbers. It can be a nice tool to have if you find that your server is spending a lot of resources but you can't locate what process is the issue. Webdock, the provider I make use of, has a very simple and slow overview of resource usage over time and I wanted something that was more real-time and more all-encompassing. But it also needed to be easy to setup and Glances is about as easy as it gets and it looks pretty cool too! All you do is setup the container and then it auto-discovers everything it needs to know.
Disclaimer: I could not for the life of me get password protection to work for this application, but we will make use of a work-around in nginx instead however that work-around only works if you have a static IP address. If you don't then anyone could see this monitor if they know of the subdomain. This isn't a problem in and of itself, but there is something else you can, which I will list in the steps as well.
First go to your DNS provider and setup a new record:
- Type: A Record
- Host: glances
- Value/Ip: your servers external IP
- TTL: Automatic
We will be accessing this container through a domain same as everything else. Now go to https://whatismyipaddress.com/ and copy the IP it shows you. This will be used in the nginx configuration.
-
sudo nano /etc/nginx/conf.d/default.conf- First we open the nginx config file. -
We need to add another server declaration as we've done a couple of times now:
server {
server_name <your subdomain here>;
location / {
    proxy_pass http://localhost:61208;
    proxy_set_header Host $http_host;
    proxy_set_header X-Real-IP $remote_addr;
    proxy_set_header X-Forwarded-For $proxy_add_x_forwarded_for;
    proxy_set_header X-Forwarded-Proto $scheme;
    allow <your ip address>;
    deny all;
}
}
As you can see here it's fairly standard affair. Place your subdomain in place of
<your subdomain here>(for example glances.mycoolsite.com) and then where it says<your ip address>put in the IP address that you got earlier from https://whatismyipaddress.com/. This will make it so that only the IPs in that list (which you can add more of if you need) can access the site. All other requests are denied. This is a workaround to their password solution because I could not make that work no matter how much I tried. Only problem is that this approach assumes you have a static IP address at your home address. An IP that never changes. Many people have changing IP addresses though rather than static, so what do you do if you don't have a static IP address? There is a different solution, it's just a bit less smooth to use. You'd have to remove theallowanddenylines in the declaration if you want to use this alternative workaround. Either way, after editing the file we save and close it by pressingCtrl + X, followed byYfollowed byEnter. -
sudo certbot --nginx- As we've done a couple of times now we fire up certbot so we can have it issue us another certificate, this time for the glances subdomain. Once that's setup we should be ready to install the container and run it. -
Go to your your portainer instance and open the Stacks screen like when we setup Gitea. Press the blue "+ Add Stack" button up to the right.
-
In the Stacks screen lets name this stack 'glances' and in the web editor window we put the following docker compose text:
services:
  glances:
    container_name: Glances
    image: nicolargo/glances:latest-full
    healthcheck:
     test: curl -f http://localhost:61208/ || exit 1
    mem_limit: 2g
    cpu_shares: 768
    security_opt:
      - no-new-privileges:true
    pid: host
    privileged: true
    network_mode: host
    restart: on-failure:5
    ports:
      - 61208:61208
    volumes:
      - /var/run/docker.sock:/var/run/docker.sock:ro
    environment:
- "GLANCES_OPT=-w"- Scroll down and press Deploy Stack.
Now your container should start up and a few seconds later be accessible via your subdomain https://glances.mycoolsite.com (or whatever your subdomain is). This should give you an overview of containers and processes running! But what about that workaround I talked about earlier? If you can't make use of the static IP setup in nginx because your IP always changes then what you do instead is simply stopping the glances container when you are done looking and start it back up when you need to have a quick...glance of your servers :-)
You can stop the glances container in your Portainer window by checking the little box out to the left of the Glances container in your containers overview and then pressing "Stop". You can start it back up by doing the same and instead pressing "Start". This isn't ideal however it is a way to still have the monitor and being able to access it without giving all of the internet access to the information.
The World is your Container
And with that you have a fairly robust little cloud setup for you and your colleagues and/or friends. You can now expand with more containers if you wish (there are literally millions of containers for all sorts of things. Just put "docker" behind whatever service you are looking to setup and there is usually a docker container for it) and you can keep expanding your subdomains and nginx configuration to accompany more containers. If you just want to setup a docker container by downloading the image from the Docker Hub you need to find the name of the creator followed by the name of the container (for example if the containers link is https://hub.docker.com/r/linuxserver/fail2ban then you'd note the linuxserver/fail2ban part of it.). You then go to your Containers page in Portainer, and in the upper right corner you'll see a blue button labeled "+ Add container". Pressing that will take you to a page that requires you to put in a name for the container and underneath it you put in the linuxserver/fail2ban part you found earlier. That's it more or less. You can then setup volumes, environment variables, etc. further down the page but that's all on a case by case basis so be sure to read the documentation before you try to install any containers. Check out this amazing repository of software solutions.
You can also setup a normal website by adding another server declarative to your configuration and then adding this:
server {

    root /var/www/html;
    client_max_body_size 256M;

    # Add index.php to the list if you are using PHP
    index index.html;

    #Which domain names will this vhost respond to
    server_name <your domain>;

    location / {
        # First attempt to serve request as file, then
        # as directory, then fall back to displaying a 404.
        try_files $uri $uri/ /index.php?$query_string;
    }

    # Necessary for Let's Encrypt Domain Name ownership validation. Place any other deny rules after this
    location ~ /.well-known {
     allow all;
    }

    # Deny access to .htaccess or .htpasswd files
    location ~ /\.ht {
        deny all;
    }

    # Deny access to any git repository
    location ~ /\.git {
        deny all;
    }

    # Deny access to xmlrpc.php - a common brute force target against Wordpress
    location = /xmlrpc.php {
        deny all;
        access_log off;
        log_not_found off;
        return 444;
    }
}
This will be a fine foundation to build on if you wish to make a more elaborate website setup. Where it says server_name <your domain>; you would put www.mycoolsite.com (your own domain) instead of <your domain>. If you haven't already you should go and setup the www record in your domains DNS settings:
- Type: A Record
- Host: www
- Value/Ip: your servers external IP
- TTL: Automatic
And lastly be sure to run certbot and setup the SSL certificate as well. All files for this website should go in the /var/www/html folder which is fairly standard for most nginx setups however you can configure nginx to do all sorts of things. (with this you could also setup SFTP access so that you can use the folder to update your website from any normal FTP client like FileZilla)
Conclusion
While this guide is long the steps are actually fairly simple and most of the work you see here is me taking the time to go through the trenches for you so you don't have to dig through old forum posts, documentation and community servers. All in all my setup took a couple of days to figure out but the actual setup of the different containers was done in a few hours. And from here you can go in any number of directions.
So I hope this will encourage more self-hosting as it is definitely one of those things I really like to do and you get to Cosplay as a Sys Admin. What's not to like? Please hit me up on bluesky if you find any glaring issues with this guide though as I might have forgotten a step here and there.
Good luck!