Simplicity is Key
If you just want the code, press here
I've recently had to get back into Godot and I like to use the C# version. Not because it's richer in features than the the GDScript version, in fact it's more like a 2nd class citizen still, but because I don't really care much for GDScript personally. It's a python-like language that only works in Godot. It has it's upsides however the locked down aspect and strong coupling with game logic kind of turns me off to it.
But enough about my bias, what are we making? A simple-as-can-be First Person camera. I want to start making code for Godot that I can drop in and use in multiple projects and having an easy camera script for first person controls is definitely one I'd use often! It requires a setup of:
- A Node3D functioning as a Y-Pivot
- A Node3D functioning as an X-Pivot which is a child of the Y-Pivot.
- All the nodes should have their rotation set to 0 so that they all point in the -Z direction (forward).
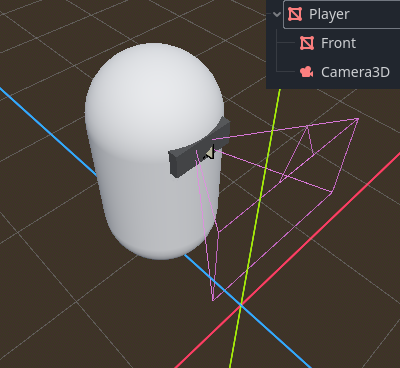
And that's it. For that, I made this simple little capsule guy:
Code
The code for this seems a bit odd at first, but is fairly simple overall. Very few operations take place, just keep in mind that Godot's coordinate system is right-handed. I would also like to state that I got help from user KEIKISHARP on the Godot Café Discord with this script as while I understand Unity fairly well, Godot is mostly uncharted lands for me.
public partial class PlayerController : Node3D
{
    [Export] private Node3D pivotX;
    [Export] private Node3D pivotY;

    public override void _Input(InputEvent @event)
    {
        if (@event is InputEventMouseMotion eventMouseMotion &&
            DisplayServer.MouseGetMode() == DisplayServer.MouseMode.Captured)
        {
            float mouseSensitivity = Config.Instance.MouseSensitivity;
            Vector3 camClamp = new(x: pivotX.Rotation.X, y: 0f, z: 0f);

            pivotX.RotateX(-eventMouseMotion.Relative.Y * mouseSensitivity);
            pivotY.RotateY(-eventMouseMotion.Relative.X * mouseSensitivity);

            camClamp.X = Mathf.Clamp(pivotX.Rotation.X, -Mathf.Pi / 2f, Mathf.Pi / 2f);

            pivotX.Rotation = camClamp;
        }
    }
}
This script should be placed on the Parent Node of the player controller. In my case (looking at the picture) that's the Node I called "Player". Let's go over the lines:
[Export] private Node3D pivotX;
[Export] private Node3D pivotY;
These two are fairly simple. Expose two Node3D variables that you need to fill in the editor. For the pivotX I placed my Camera3D node (which is a child of the Player node). The Camera will only need to move Up and Down. For pivotY I placed my Node3D called Player. This node will rotate Left and Right. Together these two nodes will function as Vertical and Horizontal direction and rotation. Next up we have:
 if (@event is InputEventMouseMotion eventMouseMotion &&
            DisplayServer.MouseGetMode() == DisplayServer.MouseMode.Captured)
This is specific to my implementation because I only really want this to work when the mouse is considered Captured by the DisplayServer. Otherwise this shouldn't trigger.
float mouseSensitivity = Config.Instance.MouseSensitivity;I get the Mouse Sensitivity I wish to apply from my Config Singleton class , which in my case is 0.0005f;. I'm not sure why it has to be so small. But if it was any bigger the camera would be unusable. You may have to adjust as needed yourself.
Vector3 camClamp = new(x: pivotX.Rotation.X, y: 0f, z: 0f);Here we store a clamp value for our pivotX because seeing as this is our Up/Down rotation we want to clamp the value later so that we can't keep going 360 degrees up and down. We have to stop somewhere so we can look up and down like you'd expect. These next lines stumped me a bit:
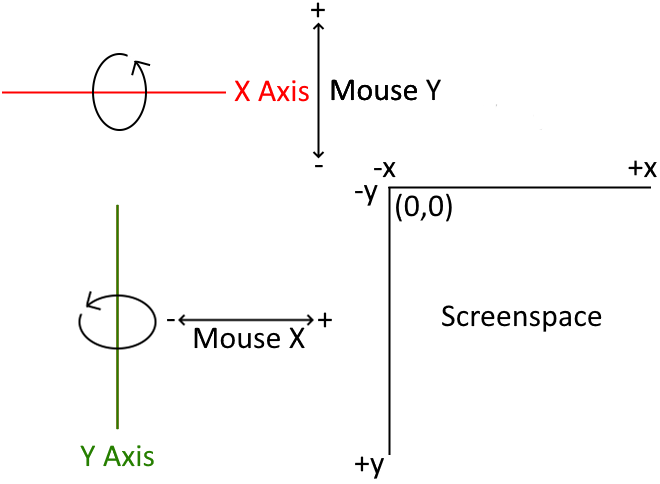
pivotX.RotateX(-eventMouseMotion.Relative.Y * mouseSensitivity);
pivotY.RotateY(-eventMouseMotion.Relative.X * mouseSensitivity);
We take the inverse Y value of our relative Mouse movement (multiplied by sensitivity) and apply it to our xPivot. Quite a few things happening here. Why do we rotate around X with the Y value? Because the Mouse movement is recorded as a 2D vector which has two directions X (Left/Right) and Y (Up/Down). But not only that, the upper left corner of the screen is Godot's origin point (0,0) in Screenspace. So a positive Y value moves down the screen while a negative Y value moves up the screen. This took me a bit to wrap my head around, but it's just a convention like how Unity's screenspace coordinate system starts in the lower left part of the screen. So whatever the value is, we take the inverse of that and apply it to our pivots. The same goes for the Y rotation but with the X input.
Here is an illustration to better visualize this:
After we have rotated around our axes we clamp the cameras X rotational value so that we cannot rotate 360 degrees around the X axis. We only want that around the Y axis:
camClamp.X = Mathf.Clamp(pivotX.Rotation.X, -Mathf.Pi / 2f, Mathf.Pi / 2f);Now why do we use -Mathf.Pi / 2 and Mathf.Pi / 2 as our threshold values? Because when we calculate these and look at the Unit Circle we find that the top of the unit circle (looking 90 degrees up) is π / 2 so the inverse must be -90 degrees (or 270) aka the bottom of the unit circle:
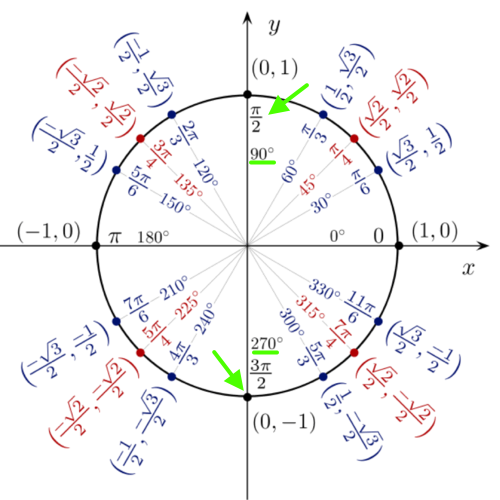
For the mininmum threshold in the Clamp call you could have done 3 * π / 2 but that's unnecessary as when you work with rotation -90 degrees is the same as 270 degrees the same as 0 degrees and 360 degrees is also the same. Lastly, we have to be aware the Godot uses Radians to calculate rotation rather than Euler values like 0 and 360. Luckily for us, the resulting calculation is already in Radians so we get that for free! If you are curious, the two calculations -Mathf.Pi / 2 and Mathf.Pi / 2 come out to be -1.5 and 1.5 respectively.
pivotX.Rotation = camClamp;To finish it off we apply the clamp to our pivotX to prevent the 360 degree rolling. And that's it!
Now the next steps would be to fill in stuff like movement with WASD and Controllers Joysticks or going to the Input Mapper and make sure you could control this camera both with the Right Joystick of a controller and the Mouse or something third.
I hope you found this helpful :-)